
Are you struggling to use your WD Passport with your Mac? You’re not alone.
Many users face compatibility issues when trying to connect their external hard drives to Apple devices. The good news? There’s a straightforward solution that will have you up and running in no time. By learning how to reformat your WD Passport for Mac, you can overcome these hurdles and enjoy seamless data transfer and storage.
This guide will walk you through each step, ensuring you maximize the potential of your device. Ready to unlock the full capabilities of your WD Passport? Let’s dive in and transform your tech experience!
Credit: www.easeus.com
Understanding Wd Passport Compatibility
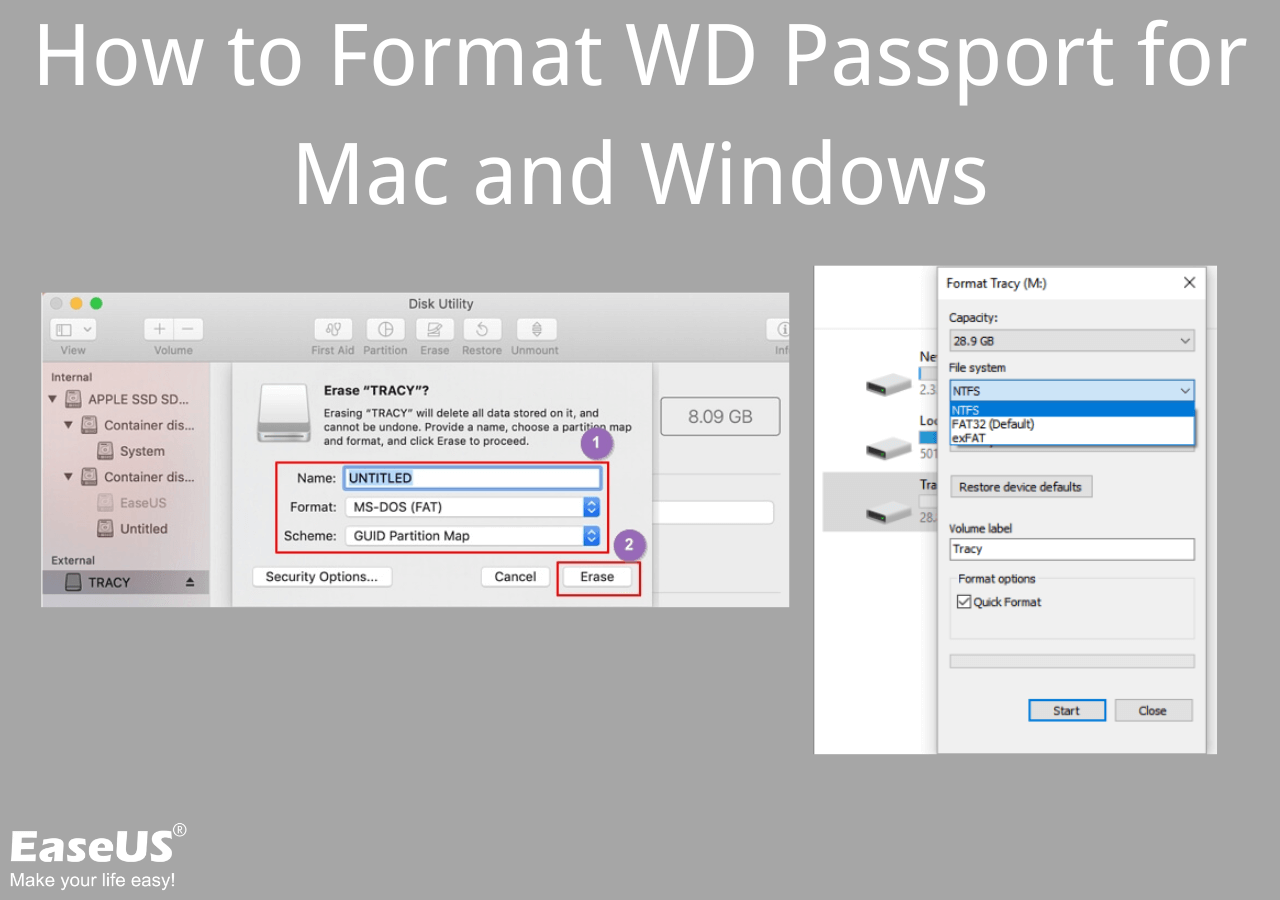
WD Passport drives work well with Windows. But they need changes for Mac. To use them, you must reformat the drive. This makes it ready for Mac. It is important to know this step.
Using the right format is key. Mac uses a special format called HFS+ or APFS. These formats work best with Mac. Reformatting helps the drive work faster. It also makes sure files save correctly.
Always back up your data first. Formatting can erase your files. Keeping a backup is safe. It protects your important files. Follow these steps, and your WD Passport will be ready.
Preparing Your Mac For Reformatting
First, ensure your Mac is ready for the task. Check the battery; it should be fully charged. Backup important files to avoid losing them. Use Time Machine or an external drive for this. Close all applications running on your Mac. This helps avoid errors during the process. Connect the WD Passport to your Mac with a USB cable. Ensure it’s detected by the system. Open Disk Utility from Applications. This is where you will start reformatting. Look for the WD Passport in the list. Make sure you choose the correct drive. Select the Erase option to begin formatting. Choose Mac OS Extended (Journaled) as the format type. This ensures compatibility with your Mac. Click Erase to start the process. Wait for the process to complete. Disconnect safely once done. Now, your WD Passport is ready for use with your Mac.
Backing Up Existing Data
Always safeguard your files. Backing up data is crucial. Connect your WD Passport to your Mac. Open Finder and locate the drive. Copy important files to your computer. Store them in a safe folder. Use Time Machine for extra safety. It helps save files automatically. You can find Time Machine in your Mac’s settings. Set it to back up your data regularly. This ensures no loss during reformatting. Double-check that all files are copied. Verify them by opening each file. Make sure nothing is missing. This step is essential. It prevents data loss. Never skip backing up before reformatting.

Credit: www.youtube.com
Accessing Disk Utility On Mac
To reformat a WD Passport for Mac, you need to use Disk Utility. It is a tool found on all Mac computers. Locate it in the Applications folder. Then, open the Utilities subfolder. Find and click on Disk Utility to launch it.
Once open, look at the left side. Here, you will see a list of drives. Find your WD Passport in this list. Click on it to select. This allows you to manage the drive.
Disk Utility helps you format drives easily. It is important for Mac users. It can fix problems with drives. Always use it carefully. It keeps your data safe.
Choosing The Right Format
Formatting a WD Passportfor a Mac is simple. Start by connecting the drive to your computer. Open Disk Utility. You find it in the Applications folder. Click on your WD Passport in the list. Choose the Eraseoption. You see a drop-down menu for formats. Select Mac OS Extended (Journaled). This format works well with Macs. It keeps your data safe. Remember, formatting deletes everything. Backup your files first. Confirm your choice by clicking Eraseagain. The process takes a few minutes. Once done, your drive is ready for use. Now, you can store files on it easily. This format helps your drive work smoothly with your Mac.
Completing The Reformat Process
First, connect your WD Passport to the Mac. Open the Disk Utilityfrom Applications. Find your WD Passport on the left panel. Click on it. Then, choose Eraseat the top. A new window will appear. Select the format type. Choose Mac OS Extended (Journaled)or APFS. Name your drive if you want. Click on the Erasebutton to start. Wait for the process to complete. Once done, the drive is ready. Now, you can use it on your Mac. Always eject safely after use.
Credit: discussions.apple.com
Frequently Asked Questions
How Do I Reformat A Wd My Passport For Mac?
Open Disk Utility on your Mac. Select WD My Passport from the list. Click “Erase. ” Choose “Mac OS Extended (Journaled)” as the format. Name your drive, then click “Erase” again to reformat.
How Do I Factory Reset Wd My Passport?
To factory reset WD My Passport, use WD Discovery software. Navigate to “Settings,” then select “Factory Reset” under “Drive Erase. ” Follow prompts to complete.
Can Wd My Passport Be Used For Mac?
Yes, WD My Passport can be used for Mac. You need to reformat it to the Mac-compatible file system. Use Disk Utility on your Mac to format it to HFS+ or APFS. This ensures compatibility and optimal performance. Always back up your data before reformatting the drive.
Can I Reformat An External Hard Drive On A Mac?
Yes, you can reformat an external hard drive on a Mac using Disk Utility. Open Disk Utility, select your drive, click “Erase,” choose the desired format, and confirm to reformat. Ensure you back up important data first, as reformatting will erase all content on the drive.
Conclusion
Reformatting your WD Passport for Mac is simple and effective. You can now enjoy seamless data transfers. Mac users often face compatibility issues. This guide helps solve that. Follow the steps carefully for best results. Your WD Passport will work smoothly with your Mac.
No more frustrating errors or delays. Always back up important data first. Protect your files. Keep your WD Passport updated. Regular updates enhance performance. Troubleshooting becomes easier. Happy computing with your newly formatted WD Passport. Enjoy the benefits of a well-organized digital life.