
Are you struggling to make your Passport external hard drive work seamlessly with your Mac? You’re not alone.
Many users face this issue, and figuring it out can feel like solving a tech puzzle. But don’t worry – you’ve come to the right place. In this guide, we’ll walk you through the easy steps to format your Passport for Mac, ensuring you can store and access your files without a hitch.
Imagine the satisfaction of having everything organized and running smoothly, just the way you want. Stick with us, and you’ll be ready to conquer this tech challenge in no time. Let’s get started!
Credit: www.easeus.com
Setting Up My Passport On Mac
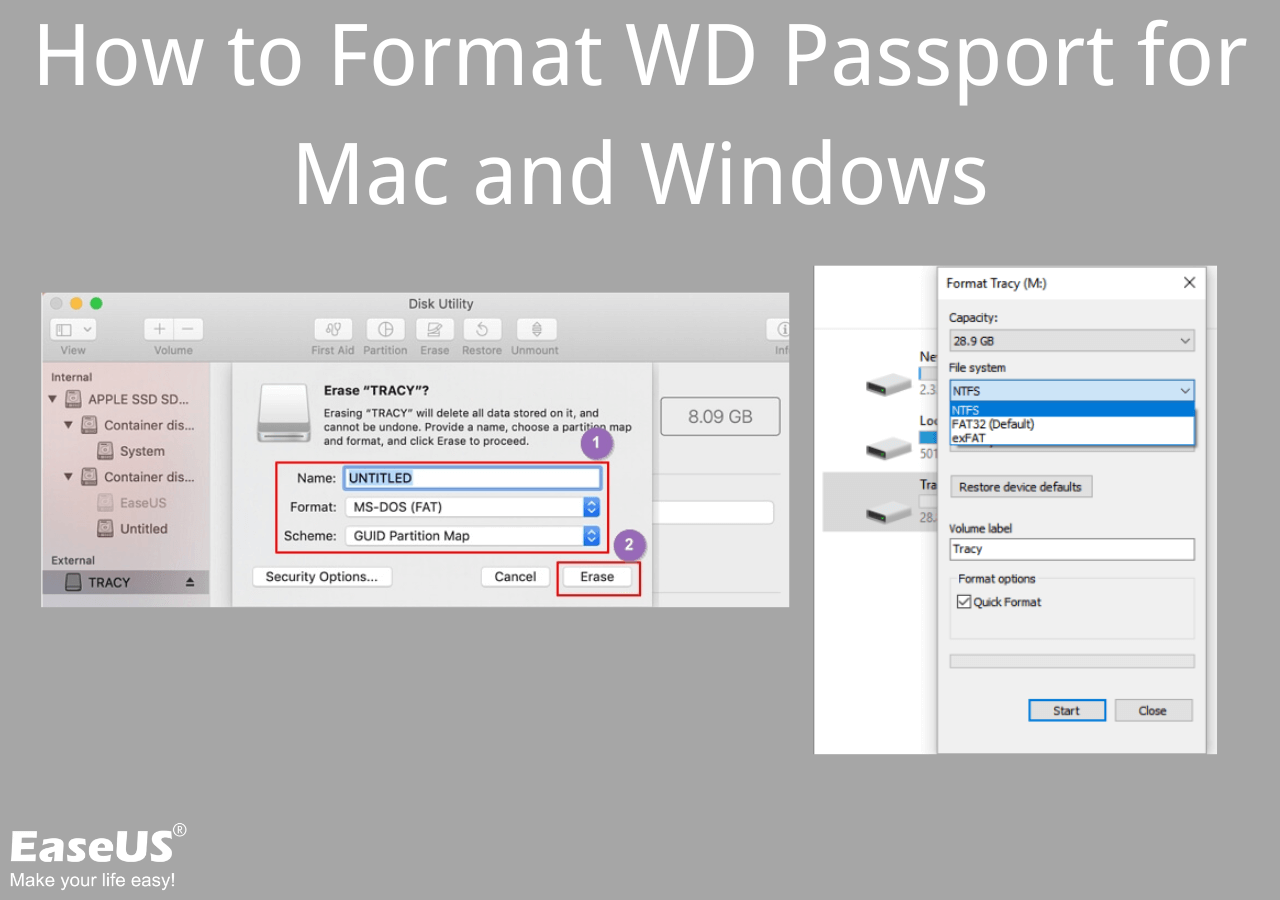
Start by connecting the My Passport drive to your Mac. Open the Disk Utility app. You can find this in the Utilities folder. Select the My Passport drive from the list on the left. Click the Erase button at the top. Choose a format. Mac OS Extended (Journaled) is a good option. Give your drive a name. Click Erase again to start the process. It will take a few moments. Wait until it finishes. This will delete all files on the drive. Make sure you have backups. Now, your drive is ready for use with Mac.
Connecting My Passport To Your Mac
Start by plugging your My Passportinto the Mac using a USB cable. Wait for the device icon to appear on your desktop. Next, open Disk Utilityfrom your Applications folder. Look for My Passport in the list on the left. Select it with a single click. This will show you its details on the right. Click the Erasebutton at the top of the window.
Choose a format that works with Mac. Mac OS Extended (Journaled)is a good choice. Then, give your device a name if you want. Click Eraseagain to confirm. Wait a few moments while your Mac formats the drive. Once done, the drive is ready. You can now use it with your Mac.
Accessing Disk Utility
First, click on the Findericon. It’s the happy face icon on the bottom left. Open the Applicationsfolder. Look for Utilities. Inside Utilities, find Disk Utility. Click to open it.
You will see a list of disks. Choose your Passport drive. It is usually named “My Passport”. On the top, select the Erasetab. This will format your drive.
Make sure to select the right format type. Mac OS Extended is a good choice. Next, press Erase. Wait for the process to finish. Your drive is now ready to use with a Mac.

Credit: www.youtube.com
Choosing The Right File Format
Mac users need a special format for files. Many choose HFS+ or APFS. These formats work great with Mac systems. HFS+ is old but reliable. APFS is new and fast. It works best with SSD drives.
ExFAT is another option. It works with Mac and Windows. Many use it for sharing files between systems. It is not as fast as APFS. But, it is a good choice for flexibility.
Always back up files before formatting. This keeps your data safe. Choose the format that fits your needs best.
Formatting My Passport Drive
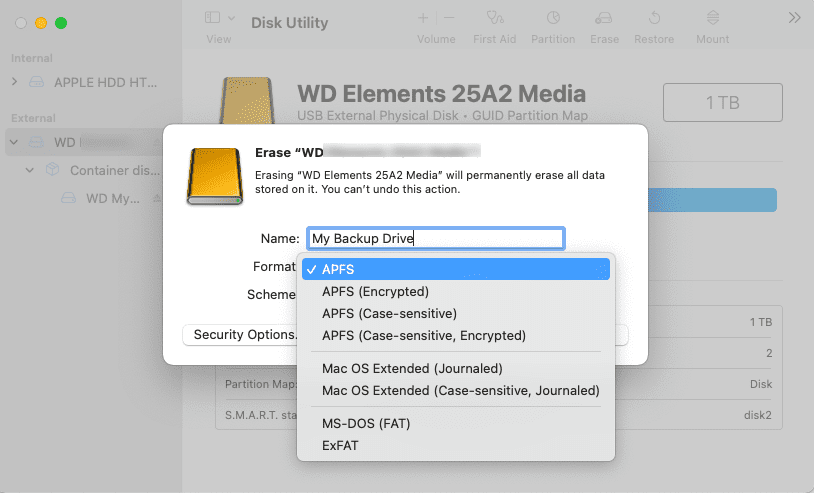
Start by plugging the My Passport drive into your Mac. Find the Disk Utilityapp. It’s in the Applications folder under Utilities. Open it up. You will see a list of drives. Look for your My Passport drive. Click on it once to select it.
Next, click on the Erasebutton at the top. A new window will appear. Choose a format. The best option is usually Mac OS Extended (Journaled). Type a name for your drive if you like. Then, click the Erase button again. Wait for the process to finish. Your drive is now formatted for Mac.
Credit: www.stellarinfo.com
Troubleshooting Common Issues
Your Mac might not recognize the external drive. First, check the USB cable. It should be connected firmly. Try a different USB port if possible. Sometimes, the drive needs power directlyfrom the wall. Plug it in using an adapter.
If the drive still doesn’t show, open the Disk Utility. Find it in the Applications folder, under Utilities. Look for your drive in the list. If you see it, try to mountit. Click on the drive, then press “Mount”.
Still having trouble? Your drive might need formatting. Backup your data first. Formatting erases everything. After backing up, choose Erasein Disk Utility. Select the correct format. For Mac, use Mac OS Extendedor APFS. Follow the steps to complete formatting.
Frequently Asked Questions
Can Wd My Passport Be Used For Mac?
Yes, WD My Passport can be used for Mac. You need to reformat it to a compatible file system like HFS+ or APFS. Use Disk Utility on your Mac for reformatting. Ensure you back up any important data before reformatting to avoid data loss.
How Do I Fix My Passport For Mac?
Connect My Passport to your Mac. Open Disk Utility. Select the drive and click “First Aid. ” Run the repair. If issues persist, reformat the drive using the “Erase” option, ensuring you back up data first. Use a compatible file system like Mac OS Extended (Journaled).
How Should I Format My External Drive For Mac?
To format your external drive for Mac, open Disk Utility. Select the drive, then click “Erase. ” Choose “Mac OS Extended (Journaled)” or “APFS” as the format. Click “Erase” to start formatting. Ensure you’ve backed up important data, as this process will erase all existing files.
Why Is My Wd Hard Drive Not Able To Format?
Your WD hard drive might fail to format due to bad sectors, write protection, or corrupted file systems. Check for physical damage, ensure it’s not write-protected, and use disk management tools to repair or format it. If issues persist, consider professional data recovery services for assistance.
Conclusion
Formatting your passport for Mac is straightforward. Follow the steps given. Ensure data backup before starting. Quick and simple process. Use Disk Utility for formatting. Choose “Mac OS Extended” format. Select “Erase” to complete. Wait patiently for the process to finish.
Safeguard your files by backing them up. Remember, formatting deletes all data. Double-check everything before proceeding. Your Mac will recognize the formatted passport easily. Enjoy seamless file transfers and storage. Feel confident in managing your passport on Mac. Keep exploring more tech tips and tricks.