
If you’ve just purchased a WD Passport and you’re eager to use it with your Mac, you’re in the right place. Setting up your WD Passport for Mac might seem daunting at first, but it’s actually a straightforward process that will have your device up and running in no time.
Imagine having a reliable, portable storage solution ready to safely store your precious files and memories. By the end of this guide, you’ll have the confidence and knowledge to configure your WD Passport, ensuring it’s perfectly tailored to meet your needs.
Get ready to discover how easy it is to unlock the full potential of your WD Passport and enhance your Mac experience. Stick around, and you’ll soon be on your way to seamless storage and backup bliss.
Credit: www.easeus.com
Preparing Your Wd Passport
Start by connecting your WD Passport to your Mac. Use a USB cable for this. Make sure your Mac recognizes the drive. You can check this in Finder. Look for the WD Passport under Devices. If you see it, you’re good to go. If not, try another USB port.
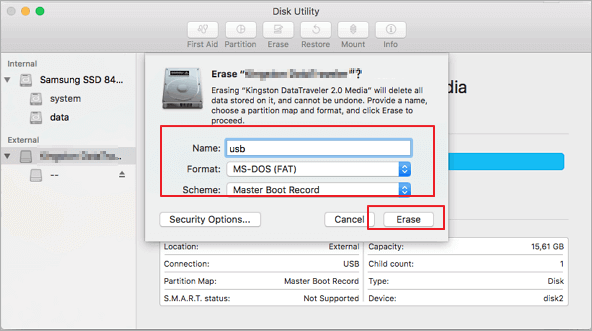
Next, open Disk Utility on your Mac. Find it in Applications > Utilities. Once open, select your WD Passport from the list. Click on Erase. Choose Mac OS Extended (Journaled) as the format. Name your drive. Then, click Erase again. This will format your drive for Mac.
After formatting, your WD Passport is ready. You can now use it with your Mac. Store files, documents, and more. Remember to eject it safely before unplugging. Happy storing!

Credit: www.youtube.com
Connecting To Your Mac
Wd Passport is a great tool for storing files. First, plug it into your Mac’s USB port. Your computer should recognize it quickly. If not, check the cable connection. It should be firm and secure.
Once connected, the Wd Passport icon appears on your screen. Click on it to open. You’ll see your files and folders. It’s easy to move or copy files. Drag and drop them where you want. Organizing files becomes simple and fast.
For better use, format your Wd Passport for Mac. Open Disk Utility from Applications. Select the Wd Passport. Choose the format option compatible with your Mac. This helps in smooth operation and file transfers.
Accessing Disk Utility
To configure your WD Passport, start by opening the Disk Utilityapp. This app is located in the Applicationsfolder. It helps manage disks and storage devices on your Mac. You will see a list of all connected drives. Find your WD Passport in this list. Click on it to select the drive.
Next, look for the Erasebutton at the top. Clicking it lets you format the drive. Choose Mac OS Extendedor APFSformat. These are best for Macs. Give your drive a name. Choose a name you will remember. Then, click Eraseto format the drive.
Formatting deletes all data on the drive. Make sure to back up important files first. This process prepares the drive for use with your Mac. After formatting, your WD Passport is ready. You can now store files and data.
Formatting The Drive
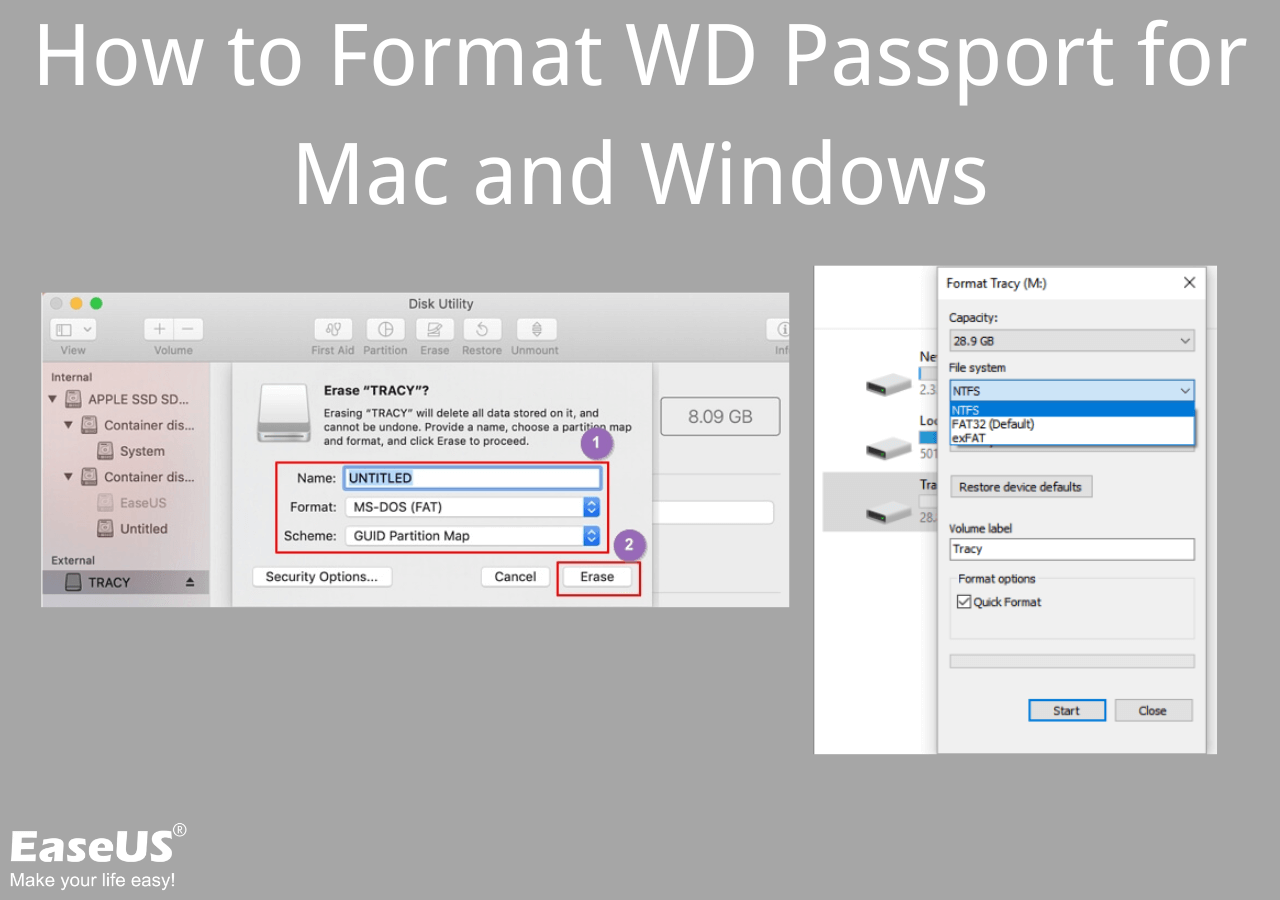
To use your WD Passport with a Mac, you must format it. Open the Disk Utility on your Mac. You can find it in the Utilities folder. Select your WD Passport from the list on the left. Click the Erase button at the top. A new window will appear. Choose Mac OS Extended (Journaled) as the format. Give your drive a name. This can be anything you like. Ensure the Scheme is set to GUID Partition Map. This is important.
Click the Erase button again. Wait for the process to finish. It should not take long. The drive is now ready for use with your Mac. Remember to back up any important files first. Formatting will delete everything on the drive. Always check twice before starting the process.
Setting Up Time Machine
First, connect your WD Passport to your Mac. Open System Preferences on your computer. Choose the Time Machine option. Click on Select Disk. Pick your WD Passport from the list. Make sure it is visible. Click Use Disk to set it up. Backups will start automatically. Always keep your WD Passport connected. It keeps your data safe. Check space on your disk regularly. Make sure you have enough room. Keep your Mac plugged in during backups. It needs power to work.
Troubleshooting Common Issues
Configuring a WD Passport for Mac often requires formatting the drive. Ensure compatibility by selecting the correct file system. Access Disk Utility from your Mac’s Applications folder, then follow the prompts to format your drive. This process resolves common connectivity issues.
Subheading Under Heading
Sometimes, the WD Passport does not show on the Mac. Check the USB connection first. Make sure the cable is not damaged. Try plugging into a different port. It might help.
The drive might need formatting. Open Disk Utility from your Mac. Select the WD Passport. Click on “Erase” and choose “Mac OS Extended (Journaled)”. Then, click “Erase” again. This will format the drive for Mac.
Is the WD Passport still not working? Check for updates. Visit the WD website. Download and install any available updates. This can solve many problems.
Credit: www.easeus.com
Frequently Asked Questions
How To Make A Wd Passport Work For Mac?
Connect the WD Passport to your Mac and open Disk Utility. Select the drive and choose “Erase. ” Format it as “Mac OS Extended (Journaled)” for compatibility. Then, click “Erase” to complete the process. Your WD Passport is now ready to use with your Mac.
How Do I Set Up Wd My Passport?
Connect WD My Passport to your computer using the USB cable. Install necessary drivers automatically or manually. Open the drive to start transferring files. Use WD software for backups and password protection. Follow on-screen instructions for setup. Ensure compatibility with your operating system.
Why Is My Wd Passport Not Detected On My Mac?
Ensure your WD Passport is properly connected. Check compatibility with macOS and update drivers if needed. Use Disk Utility to verify and repair the drive. Restart your Mac and try different USB ports or cables. Consider using third-party software for troubleshooting if the issue persists.
How To Retrieve Files From Wd Passport For Mac?
Connect your WD Passport to your Mac. Open Finder and locate your drive. Drag files to your desired location. Use Disk Utility if needed. Ensure your drive is properly formatted for Mac compatibility. Always safely eject the drive after use.
Regularly back up important files to avoid data loss.
Conclusion
Configuring your WD Passport for Mac is straightforward and rewarding. Follow the steps carefully to ensure smooth operation. Backup your data regularly to avoid loss. Keep your device updated for optimal performance. Remember, compatibility ensures efficiency. Proper configuration enhances usability.
Enjoy seamless file transfers and reliable storage. Protect your data with encryption options. Use your WD Passport to maximize your Mac’s storage potential. Troubleshoot common issues with ease. Your Mac experience will improve with the right setup. Happy computing with your newly configured WD Passport!