
Are you struggling to get your new My Passport drive to work seamlessly with your Mac? You’re not alone.
Many Mac users face the same challenge when trying to format their external drives. But the good news is, it’s easier than you might think! Imagine effortlessly transferring files, backing up crucial data, and expanding your storage in just a few simple steps.
By learning how to format your My Passport for Mac, you’ll unlock a world of possibilities for your digital life. Stick around, and we’ll guide you through the process with clear, straightforward instructions. Let’s get your device up and running smoothly, so you can focus on what really matters.
Preparing Your My Passport Drive
Start by connecting the My Passport drive to your Mac. Make sure it is securely attached. Open Finder and search for the drive. You should see it listed on the left side. Click on the drive name to select it. Double-check to ensure the correct drive is selected. This step is important to avoid mistakes.
Next, open Disk Utility. This tool helps in formatting. Find the Applications folder, then Utilities. Click on Disk Utility. Look for your drive in the list. Select it carefully. Double-check your selection again. Mistakes can be costly.
Credit: www.stellarinfo.com
Connecting The Drive To Your Mac
First, find the USB cable. Connect the My Passport drive to your Mac. Make sure the cable fits well. Your Mac should detect the drive quickly. Look for a light on the drive. This means it’s working. Open Finder on your Mac. Check if the drive name shows up. It usually appears on the left side. Click on the name to access files. If you see the files, the connection is good. No files? Check the cable again. You might need to push it in harder.
Accessing Disk Utility
Open the Finder. Click on Applications. Find the Utilitiesfolder. Click on it. Locate Disk Utility. Double-click it to open. This tool helps manage disks.
Ensure your My Passport is connected. Check it’s visible in the list. If not, reconnect it. Select your drive from the list on the left. Ensure you choose the right one.
Disk Utility offers options. You can eraseor partitionyour drive. Erasing removes all data. Partitioning divides your drive into sections. Choose what suits your needs.
Formatting is simple. It prepares your My Passport for Mac use. Follow the steps carefully. Your drive will be ready soon.
Credit: www.easeus.com
Selecting Your Drive
First, plug in your My Passport driveto your Mac. Open the Finderon your desktop. Look for your drive on the left side. It will be under Devices. Click on it to select the drive. Make sure it’s the right one. This step is very important.
Now, open Applicationsfrom the bottom. Click on Utilities. Find and open Disk Utility. This tool helps manage your drives. In Disk Utility, you’ll see your drive listed. Click on it again. This confirms your choice.
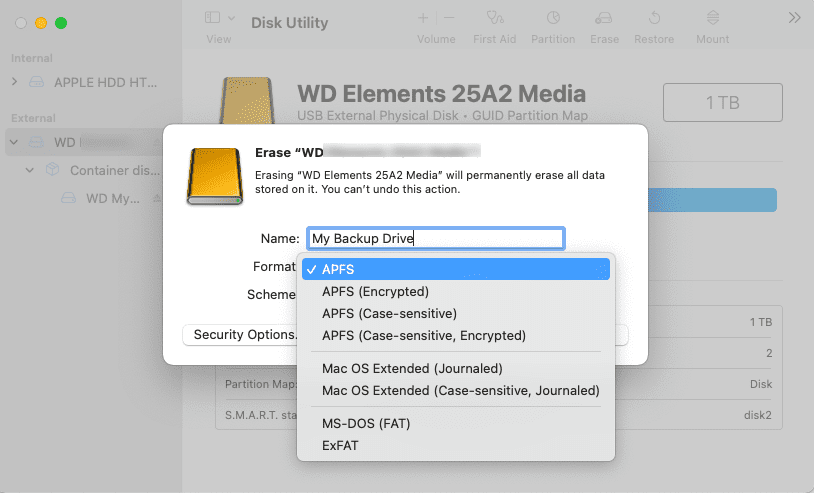
Choosing The Format Type
Picking the right format for your My Passport is crucial. ExFAT works well if you switch between Mac and Windows. It is flexible for different systems. Mac OS Extended is best for Mac-only use. It provides advanced features like Time Machine backup. APFS is the newest format, offering better speed and security. Perfect for latest macOS versions. NTFS is not recommended for Mac. It is mainly for Windows users. Make sure to back up your data before formatting. Formatting erases all files, so be careful. Choose wisely based on your needs.

Credit: www.youtube.com
Completing The Formatting Process
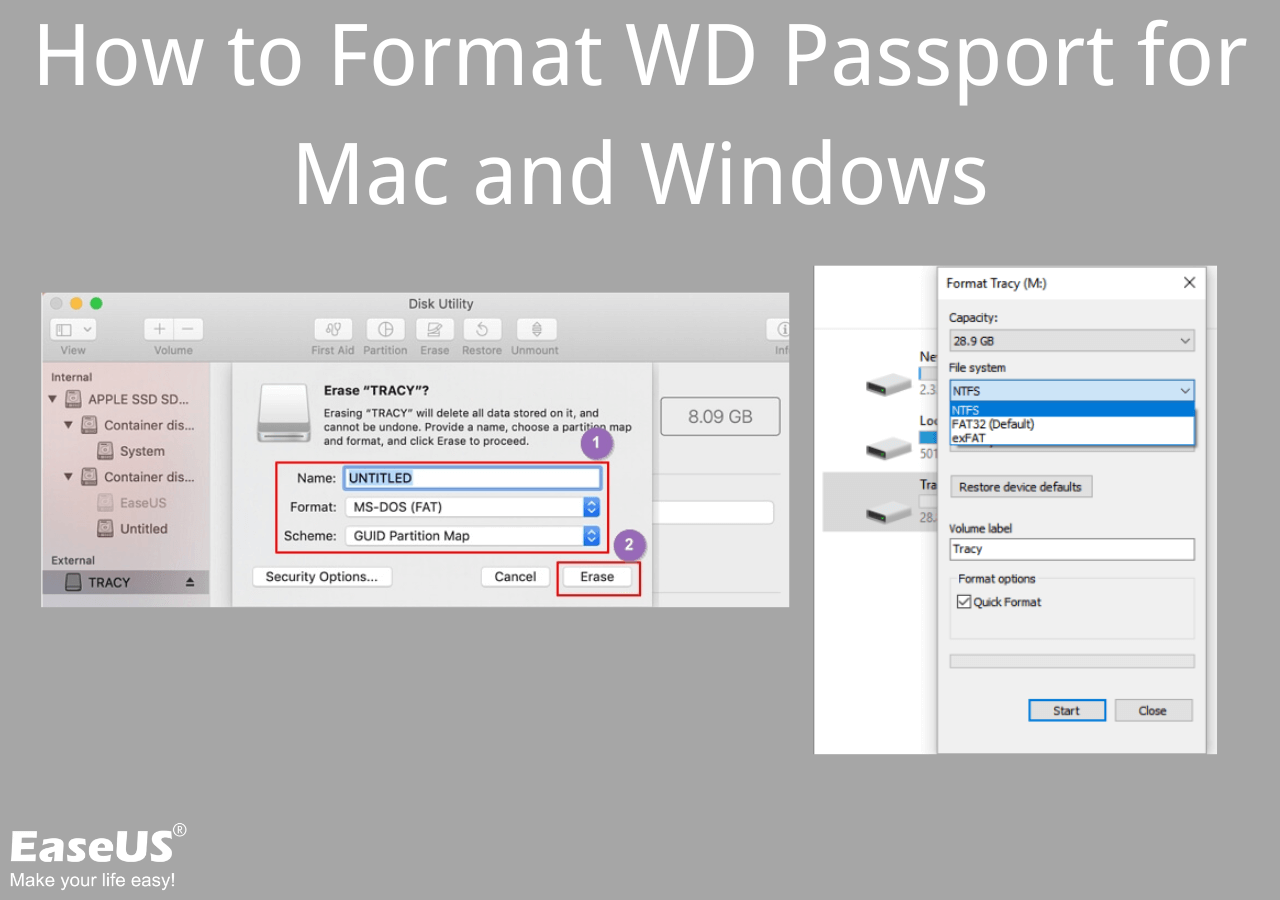
Open the Disk Utility on your Mac. Connect your My Passport drive to your computer. Select the drive from the left sidebar. Click on the “Erase” button at the top. A new window will pop up. Choose “Mac OS Extended (Journaled)” from the format drop-down. Type a name for your drive. It can be anything you like.
Click on the “Erase” button again to start. Wait for the process to finish. It might take a few minutes. Once done, you will see a message. It says the drive is ready. You can now use your drive on Mac. Remember to eject it safely before unplugging.
Frequently Asked Questions
How Do I Format My Wd Passport For Mac?
To format your WD Passport for Mac, open Disk Utility, select the drive, and click “Erase. ” Choose “Mac OS Extended (Journaled)” as the format. Click “Erase” again to confirm. Your WD Passport is now formatted for Mac use.
Can Wd My Passport Be Used For Mac?
Yes, WD My Passport can be used with Mac. It requires reformatting to be compatible with macOS. After reformatting, it works efficiently for backups and file storage. Ensure to use compatible software for seamless operation.
How To Format An External Hard Drive For A Mac?
Open Disk Utility from Applications > Utilities. Select your external hard drive. Click Erase. Choose “Mac OS Extended (Journaled)” or “APFS” format. Name the drive, then click Erase.
How Do I Fix Wd My Passport For Mac?
To fix WD My Passport for Mac, ensure it’s correctly connected, update the macOS, and use Disk Utility to repair. Backup data before formatting, if necessary. Check for firmware updates on WD’s website to enhance compatibility.
Conclusion
Formatting your My Passport for Mac is simple and straightforward. Follow the steps carefully. Always back up important files first. Choose the right format for your needs. Ensure compatibility with other devices. Regular maintenance keeps your drive running smoothly. Don’t forget to update software periodically.
A well-formatted drive enhances performance. It’s a small task with big benefits. Keep your digital life organized and secure. Enjoy seamless file transfers and storage solutions. Your Mac and My Passport make a great team. Happy formatting!