
Struggling with how to format your Passport for Mac? You’re not alone.
Many Mac users find themselves puzzled when trying to set up an external hard drive. Don’t worry, though. By the end of this guide, you’ll know exactly how to format your Passport for seamless use with your Mac. Imagine the relief of having your external drive ready for all your storage needs, without any compatibility issues.
We’ve got you covered with simple steps that will make the whole process a breeze. Ready to dive in and gain peace of mind with your perfectly formatted Passport? Let’s get started!
Credit: recoverit.wondershare.com
Understanding Passport For Mac
Passport for Mac is a handy tool. It helps manage files and folders. You can format drives easily. This tool is user-friendly and simple.
Formatting with Passport is quick. It clears old data from drives. This process makes space for new files. Always back up important data first.
To format, connect Passport to your Mac. Open the utility app. Choose the drive you want to format. Select the format option. Follow the steps on the screen. Your drive will be ready in minutes.
Make sure your Mac is updated. This helps avoid errors during formatting. Passport for Mac works best with the latest software. Regular updates improve performance.
Remember, formatting erases data. Be careful when choosing drives to format. Only format drives you don’t need. This keeps your files safe.
Preparing Your Mac
Ensure your Mac is charged and connectedto a stable power source. Check for any software updatesand install them. Updates can fix bugs. They can improve performance. Make sure your Mac is backed up. Use Time Machine for backups. Backups protect your data. You need a compatible cablefor the Passport. Check if you have the right cable. Use USB or Thunderbolt cables. These are common and reliable. Also, keep your Passport handy. Place it near your Mac. Ready to connect.
Connecting Passport To Mac
First, plug the Passportinto your Mac using a cable. Look for a USB port on your Mac. Use the right cable for the best connection. Wait for the Passport to show up on your screen. It might take a few seconds.
Click on the Passport icon. This will open the folder with files. If you see files, your Passport is connectedwell.
If the Passport doesn’t appear, check the cable. Make sure it is plugged in correctly. Try a different port if needed. Sometimes, restarting your Mac helps. If problems persist, seek help from a friend.
Credit: www.easeus.com
Accessing Disk Utility
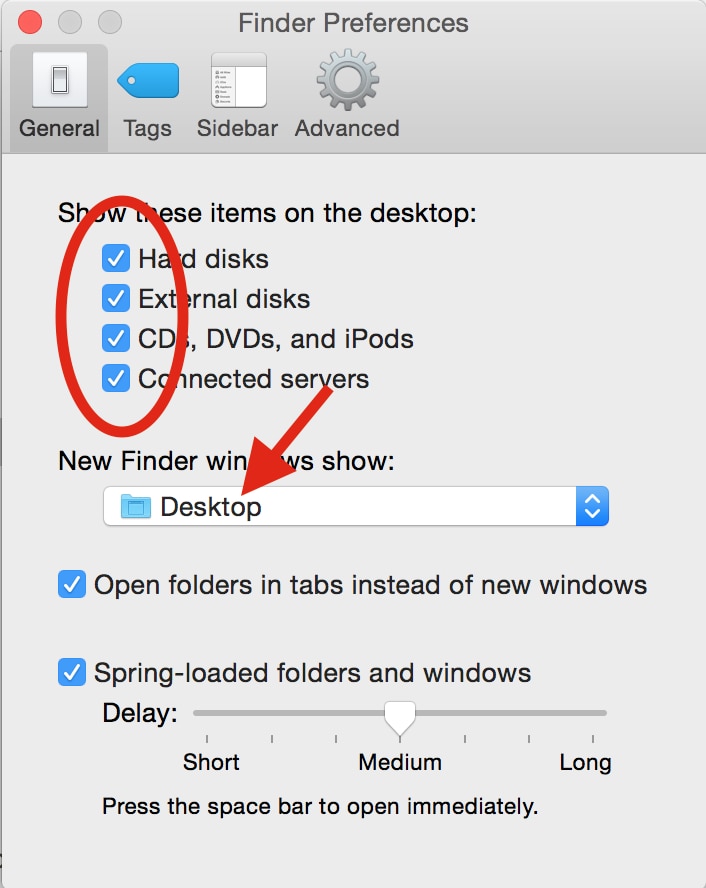
Start by clicking the Findericon on your Mac. Look for Applicationsin the sidebar. Inside, find the folder named Utilities. Open it. Find Disk Utilityand click it. Now, your Disk Utility window is open.
Look at the left side. You will see a list of devices. Find your Passport drivehere. Click on it. Check its name. Make sure it is the correct one.
Disk Utility lets you manage disks. You can format, erase, or partition. It is very useful for your Mac. Keep it handy for disk tasks.
Formatting The Passport Drive
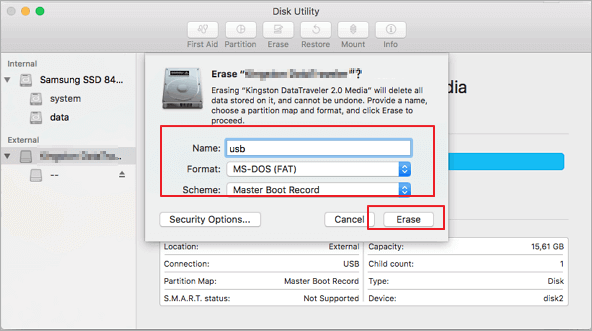
First, connect the Passport drive to your Mac. It should appear on the screen. Open the Disk Utilityapplication. This app helps you manage drives. Look for your Passport drive in the list on the left. Click on it to select it. Then, find the Erasebutton at the top.
A new window will appear. Choose a name for your drive. Pick a format from the list. For Mac, choose Mac OS Extended (Journaled). This option is best for most users. If you plan to use the drive with Windows too, select exFAT. Then, click Eraseto start formatting. Wait a few moments for the process to finish. Your drive is now ready to use!

Credit: www.youtube.com
Verifying And Ejecting The Drive
Ensure your drive is connected. Open Finderon your Mac. Look for the drive under Devices. Click on it to access. To verify, check the drive’s contents. Are files visible? If yes, the connection is good. If no files, try reconnecting the drive.
To eject, click the eject iconnext to the drive’s name. Wait a moment. The drive icon should disappear. Once gone, it’s safe to remove. Never pull out the drive without ejecting. It can damage files.
Always handle the drive with care. Properly ejecting keeps your data safe.
Frequently Asked Questions
How To Resize Image To Passport Size On Mac?
Open the Preview app. Go to “Tools” and select “Adjust Size. ” Set dimensions to 2×2 inches. Save the image.
Can Wd My Passport Be Used For Mac?
Yes, WD My Passport can be used for Mac. Format the drive to HFS+ or APFS using Disk Utility. Ensure compatibility with macOS for seamless functionality and storage.
How Do I Fix My Passport For Mac?
To fix Passport for Mac, connect your device, open Disk Utility, select the drive, and click “First Aid. ” If issues persist, consider reformatting. Always back up important data before reformatting. Ensure your MacOS is updated to the latest version for compatibility.
How To Correctly Format An External Drive On A Mac?
Open Disk Utility from Applications > Utilities. Select your external drive. Click “Erase. ” Choose “Mac OS Extended (Journaled)” or “APFS. ” Click “Erase” again to format. Ensure you back up important data before formatting.
Conclusion
Formatting a Passport for Mac is simple with the right steps. Follow the guide carefully to avoid errors. Start by connecting your Passport to the Mac. Open Disk Utility from the Applications folder. Select your Passport and choose the ‘Erase’ option.
Pick ‘ExFAT’ or ‘Mac OS Extended (Journaled)’ format. Click ‘Erase’ to begin formatting. Wait until the process completes. Safely eject the Passport once done. Now, it’s ready for use with your Mac. These steps ensure smooth formatting. Keep your data safe and accessible.
Enjoy your newly formatted Passport.