
Are you struggling to get your WD My Passport working with your Mac? You’re not alone.
Many Mac users face the same challenge when trying to use their external drives for the first time. But don’t worry—reformatting your WD My Passport for Mac is simpler than you think. This guide will walk you through the process step by step, ensuring your drive is ready to store all your important files in no time.
Imagine the relief of having everything running smoothly, without the hassle of compatibility issues. By the end of this article, you’ll have the confidence to handle your tech with ease. Let’s dive in and get your drive Mac-ready!
Credit: www.easeus.com
Check Compatibility
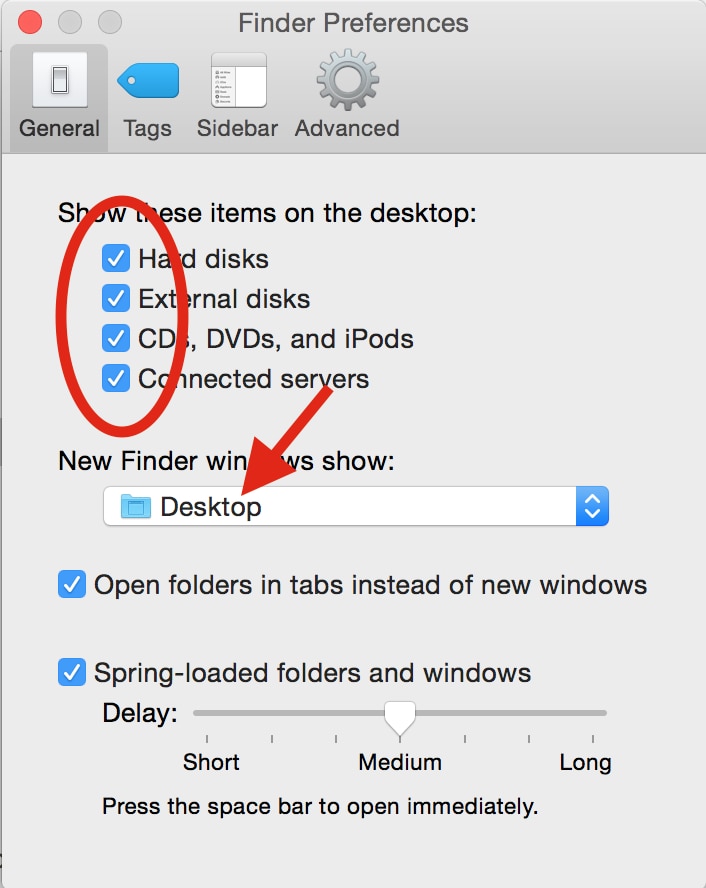
Before reformatting, ensure your WD My Passport works with a Mac. Compatibility is key. Plug in the drive to your Mac. Check if it shows up in Finder. If it doesn’t, visit the WD website. Download the needed drivers for Mac. This helps the drive to be recognized. Go to the Apple menu. Select About This Mac. Click on System Report. Look for your drive under USB. If it is there, your device is compatible. If not, double-check connections and try again. Having the right cables is important too. A faulty cable can cause issues. Ensuring compatibility saves time and effort. Once confirmed, move on to the next step.
Credit: recoverit.wondershare.com
Backup Important Data
Always save your filesbefore you start. It’s crucial to keep everything safe. You don’t want to lose your work or pictures. Use cloud storagelike Google Drive. Or try using an external hard drive. Transfer your files there. This way, they are protected. Double-check your files are copied correctly. Make sure you can open them. This ensures they are not corrupt. Organizethem neatly. This helps you find them later.
Connect Drive To Mac
First, plug the WD My Passport into the Mac. Use a USB cable that fits the drive. The device needs power to work. Check the light on the drive. A blinking light means it’s connected. Mac will detect the drive quickly. Open Finder to see the device. Look for the drive on the left side. Click the drive to access files. Now, you are ready to format the drive. This step is important before using the drive.
Open Disk Utility
First, locate the Disk Utilityon your Mac. Go to the Finder and click on Applications. Then, find and click on Utilities. Inside, you will see the Disk Utility tool.
Double-click the Disk Utilityicon to open it. This tool helps to manage disks on your computer. Look for your WD My Passportin the list on the left side. Click on it to select the drive.
To reformat, use the Erasetab at the top. This option will delete everything on the drive. Be sure to save important files first.
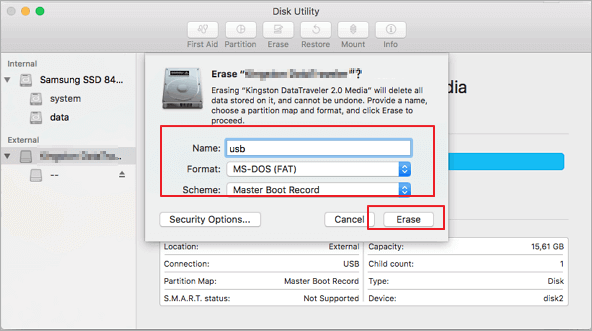
Select And Erase Drive
First, open the Disk Utility on your Mac. Find your WD My Passport in the list. Click on it to select. Look for the Erase option at the top. Click on it to start. Choose Mac OS Extended (Journaled) format. This format is best for Mac. Set the Scheme to GUID Partition Map. This helps your Mac recognize the drive. Now, confirm by clicking on Erase. The process will begin. Wait for it to finish. Your drive is now ready for use on Mac.
Remember, this will delete all data. Backup important files first. After erasing, check if the drive works. Open Finder and see if it appears. If yes, you’re done. If not, try again. Follow each step carefully. This ensures a smooth process. Always ensure the drive is connected properly. This prevents errors during erasing. Use these steps to reformat your drive easily.
Format With Mac File System
First, connect the WD My Passport to your Mac. Open the Disk Utilityapp. You’ll find it in the Utilities folder. Select your drive from the list on the left. Click the Erasebutton at the top. A new window will appear. Choose Mac OS Extended (Journaled)as the format. This is the best choice for most users. Name your drive if you want. Then click Eraseto start the process. Wait until it finishes. Your drive is now ready to use with your Mac.
Credit: discussions.apple.com
Frequently Asked Questions
How Do I Reformat My Wd Passport For Mac?
Open Disk Utility on your Mac. Select your WD Passport. Click “Erase” and choose “Mac OS Extended (Journaled)” as the format. Click “Erase” again to confirm. Your WD Passport will be reformatted for Mac.
How Do I Factory Reset Wd My Passport?
To factory reset WD My Passport, download WD Drive Utilities software. Open the software, select your drive, and choose ‘Erase Drive’ option. Follow the prompts to complete the process. Ensure you back up important data before resetting, as this will permanently delete all stored files.
Can Wd My Passport Be Used For Mac?
Yes, WD My Passport can be used with Mac. Simply reformat it to a compatible file system like HFS+ or APFS. Ensure you back up data before reformatting to avoid loss. WD provides software and guides for setup, making it easy to use with Mac computers.
How To Reformat An External Hard Drive For A Mac?
Connect the external hard drive to your Mac. Open Disk Utility from Applications > Utilities. Select the drive, click “Erase,” choose “Mac OS Extended (Journaled)” or “APFS” format, then click “Erase” again. Wait for the process to finish. Your hard drive is now reformatted for Mac use.
Conclusion
Reformatting your WD My Passport for Mac is simple. Follow the steps carefully. Ensure your data is backed up before starting. Use Disk Utility for a smooth process. This tool helps you manage drives effortlessly. Reformatting improves compatibility with Mac systems.
It makes file transfers easier and quicker. Remember, formatting erases existing data. Double-check before proceeding to avoid data loss. Stay organized and keep track of important files. Now your WD My Passport is ready for Mac use. Enjoy seamless storage and enhanced device performance.