
Are you struggling to get your WD Passport to work with your Mac? You’re not alone.
Many users face compatibility issues, leaving them frustrated and unsure of how to proceed. But don’t worry; reformatting your WD Passport for Mac is easier than you think. Imagine the relief of finally having your external drive working seamlessly with your computer, storing your files and memories without a hitch.
This guide will walk you through the simple steps to make that a reality. With a few clicks, you can transform your device into a Mac-compatible powerhouse. Ready to unlock your WD Passport’s full potential? Let’s dive in and get your device up and running smoothly!
Credit: recoverit.wondershare.com
Preparing Your Wd Passport
Start by connecting your WD Passportto your Mac. Use the USB cable. Wait for your Mac to recognize it. Open the Finder on your Mac. Check if the WD Passport appears. If it does not, try reconnecting it. Ensure the cable is not broken. Check for any software updates on your Mac. Updates can fix connection problems. After confirming the connection, you are ready to proceed.
Backup any important files first. Use Time Machine or another backup tool. This step is crucial. Formatting will erase all data. Double-check your backup. Make sure files are safe. You want to avoid data loss. Keeping files safe is very important.
Credit: discussions.apple.com
Backing Up Important Data
Always protectyour data. Save it on another device. Cloud storage is a good choice. It keeps files safe. External drives work too. Easy to use. Remember, data is precious. You don’t want to lose it.
Check your files. Make sure all are copied. Double-check everything. Important files like photos. Documents matter too. Don’t skip this step. It saves time later.
Organize your files. Sort by type or date. Easy to find later. Helps in quick access. Keeps your drive clean. Easy and simple.
Connecting To Your Mac
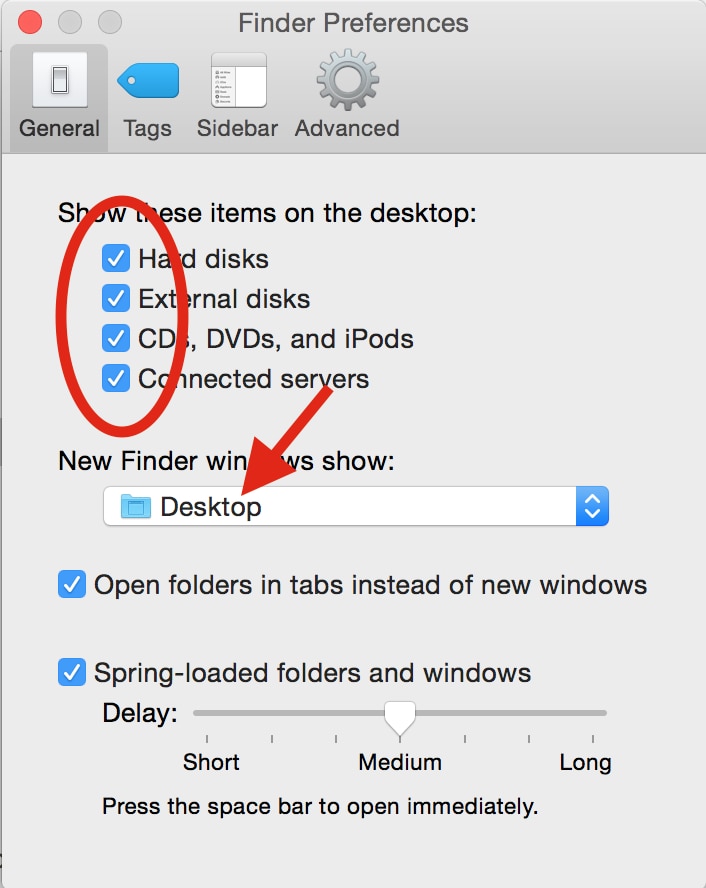
Start by plugging in the WD Passportto your Mac. Use a USB port for this. Make sure the cable is connected well. Once connected, the drive should appear on the desktop. If not, check the Findersidebar. Sometimes, it hides in there. The drive might need power, so ensure it’s plugged in.
After finding the drive, open Disk Utility. This is in the Applications folder. Inside, click on the WD Passport. It’s usually on the left side. Here, you can see the drive’s information. This includes its name and storage capacity. Now, you’re ready to start the reformatting process.
Accessing Disk Utility
To reformat your WD Passport, you need the Disk Utility tool. First, connect your WD Passport to your Mac. Check if your Mac recognizes the device. Next, open the Finder and go to Applications. Inside Applications, find the Utilities folder. Click to open it. Look for the Disk Utility icon. It’s usually a silver hard drive image. Click on it to launch the tool.
Once open, check the left sidebar. Here, you will see a list of devices. Find and select your WD Passport. Make sure you choose the right drive. Selecting the wrong drive can cause data loss. Disk Utility is essential for managing drives. It’s simple but very powerful. Remember, always back up data before formatting. This prevents unwanted data loss.
Choosing The Right Format
Mac computers prefer HFS+ or APFS formats. HFS+ is older but still good. APFS is newer and faster. Both work well with Mac. ExFAT is another option. It works with Mac and Windows. Choose ExFAT if you use both systems.
NTFS format does not work well on Mac. Mac can only read NTFS. It cannot write to it. Avoid NTFS for Mac use. FAT32 is very old. It has limits on file size. Do not choose FAT32 for large files.
Pick the format based on needs. Think about speed and file size. Ensure format is compatible with your devices. Format choice affects performance. Choose wisely for best results.
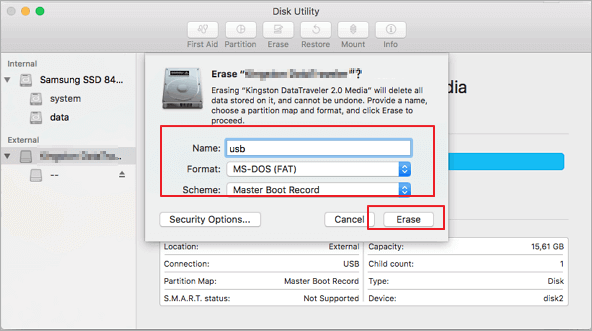
Finalizing The Reformat
After setting up your drive, it’s time to finish. Double-check your chosen settings. Make sure the format is compatiblewith Mac. You want it to be HFS+or APFS. These work well with Mac. Go to Disk Utility. Click the Erasebutton. This will start the reformatting. Be patient. It might take a few minutes. Once done, your drive is ready. You can now use it for storageon Mac. Remember, all data will be wiped. Make sure you have backups if needed. Your WD Passport is now formatted for Mac. Ready for use.
Credit: www.easeus.com
Frequently Asked Questions
How Do I Reformat A Wd My Passport For Mac?
Open Disk Utility on your Mac. Select your WD My Passport drive. Click “Erase. ” Choose “Mac OS Extended (Journaled)” or “APFS” format. Click “Erase” again to reformat.
How Do I Factory Reset Wd My Passport?
To factory reset WD My Passport, connect it to your computer. Use WD Discovery software to erase the drive. Follow on-screen instructions to complete the reset process. Ensure important data is backed up before proceeding, as this will delete all stored information.
How To Reformat An External Hard Drive For A Mac?
Open Disk Utility on your Mac. Select your external hard drive from the list. Click “Erase. ” Choose “Mac OS Extended (Journaled)” or “APFS” from the Format dropdown. Name your drive, then click “Erase” again to reformat. Your external hard drive is now ready for Mac use.
How Do I Fix Wd My Passport For Mac?
Restart your Mac and reconnect the WD My Passport. Update the drive’s firmware. Repair disk using Disk Utility. Check for corrupted files and back up data.
Conclusion
Reformatting your WD Passport for Mac is simple. Follow the steps carefully. Start by backing up essential files. Then, connect your WD Passport to your Mac. Use Disk Utility to format the drive. Choose the right file system for compatibility.
APFS is great for modern Macs. For older systems, consider Mac OS Extended. After formatting, transfer files back. Your WD Passport is now ready for use. Regular maintenance keeps it running smoothly. Enjoy seamless file management on your Mac.