
Struggling to get your WD Passport working smoothly with your Mac? You’re not alone.
Many Mac users face compatibility issues when trying to use external drives, especially when they’re formatted for Windows. But here’s the good news: reformatting your WD Passport for Mac is easier than you might think. Imagine the satisfaction of having your drive operate seamlessly, storing and retrieving your files without a hitch.
In this guide, I’ll walk you through each step, ensuring you avoid common pitfalls and make the most of your storage device. Ready to unlock the full potential of your WD Passport on your Mac? Let’s dive in and transform your tech experience.
Understanding Wd Passport Compatibility
WD Passport works with many devices. But it needs to be set up right. Mac computers need a special format. This format is called Mac OS Extended. It helps the computer read the WD Passport well.
Not using the right format can cause problems. The Mac might not see the files. Or it might not save new files. This is why reformatting is important. It makes the WD Passport work well with Mac.
Always make a backup of your files first. Reformatting deletes all data. Backups keep your files safe. Use another drive or cloud for this. Once backed up, start the reformat process.

Credit: www.youtube.com
Preparing Your Wd Passport
Your WD Passport needs special steps for Mac use. First, check the current format. It might be set for Windows. Macs need a different format. Plug your WD Passport into your Mac.
Open Disk Utility from the Applications folder. It helps manage drives. Find your WD Passport in the list. Click on it. You need to choose the right format. Mac OS Extended is a good choice. It works well with Macs.
Click the Erase button. This will delete everything on the drive. Make sure you have backups. Once erased, your WD Passport is ready for Mac. You can store files easily now. Follow these steps to prepare your drive.
Choosing The Right File System
Selecting the best file system for your WD Passport on Mac is crucial. File systems determine how data is stored and accessed. NTFS works well with Windows but is not suitable for Mac. ExFAT is a good choice for both Mac and Windows users. It supports large files and is easy to use. FAT32 is another option but has a 4GB file size limit. It’s compatible with most devices but might limit your file size. APFS is the native file system for Mac. It offers better performance and security. Choose APFS if you only use your WD Passport on Mac. Always back up your data before formatting. This ensures no data loss during the process. Select the file system based on your usage needs. Consider compatibility and file size requirements.
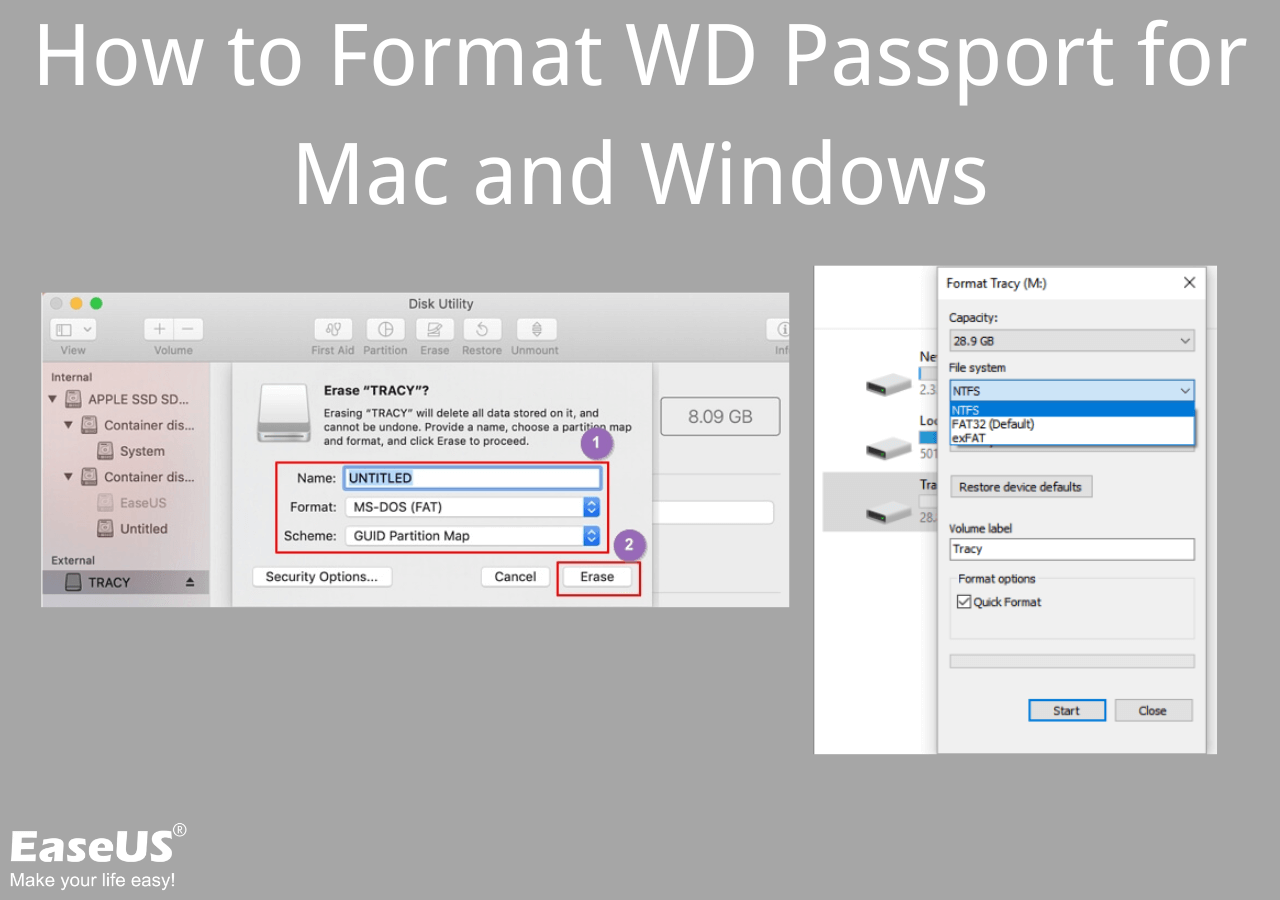
Credit: www.easeus.com
Using Disk Utility On Mac
Disk Utility is a tool on Mac. It helps manage drives. You can use it to reformat your WD Passport. Open Finder first. Then go to Applications. Find Utilities and click on it. You will see Disk Utility there.
Connect your WD Passport to the Mac. Open Disk Utility. Look for your drive on the left side. Click to select it. Now, find the Erase button at the top. A new window will pop up. Choose Mac OS Extended (Journaled) from the format list. Give your drive a new name. Click on Erase to start the process.
Reformatting Steps
Ensure your Mac is ready for the task. Connect the WD Passportto the Mac. Open the Disk Utilityapplication from the Utilities folder.
Find your WD Passportin the list on the left. Click on it to select. Make sure you choose the correct drive.
Click on the Erasebutton at the top. Choose Mac OS Extended (Journaled)from the format dropdown. Give your drive a new name if you like.
Press Eraseagain to start. Wait for the process to finish. Once done, your drive is ready for use with Mac.
Troubleshooting Common Issues
Some people face issues with their WD Passport on a Mac. Sometimes, the drive does not show up. First, check the USB cable. Ensure it is connected well. Try using a different port. This can help fix connection issues. If the drive still does not appear, open Disk Utility. It is a tool on the Mac. Here, you can see all connected drives. Find your WD Passport. If it shows up, select it. Click on “First Aid” to check for errors. This can fix small problems.
Formatting issues can also occur. Make sure to choose Mac OS Extended or APFS. These formats work best with Mac. If you see an error, restart the computer. Sometimes, a simple restart solves many problems. If problems persist, consider reaching out for help. Experts can provide more solutions.
Credit: discussions.apple.com
Frequently Asked Questions
How Do I Factory Reset Wd My Passport?
To factory reset WD My Passport, open WD Drive Utilities. Select your drive, click “Erase,” and follow prompts. Backup important data first.
How To Reformat An External Hard Drive On A Mac?
Open Disk Utility from Applications. Select your external hard drive. Click “Erase” at the top. Choose the format type. Click “Erase” again to confirm.
Can Wd My Passport Be Used For Mac?
Yes, WD My Passport can be used for Mac. Format the drive with Mac-compatible file system like HFS+ or APFS. Use Disk Utility to format it. Ensure your data is backed up before formatting. After formatting, enjoy seamless compatibility with Mac for storage and backups.
How Do I Fix Wd My Passport For Mac?
To fix WD My Passport for Mac, check the USB connection and try a different port. Use Disk Utility to repair the drive. Update drivers and software for compatibility. If issues persist, consider reformatting the drive, ensuring data backup beforehand.
Conclusion
Reformatting your WD Passport for Mac is straightforward. Follow the steps to ensure compatibility. Start by backing up your data. No one wants to lose important files. Next, use Disk Utility to format the drive. Choose the right file system for Mac.
It’s easy to select during the process. After formatting, test your drive. Make sure it’s working well with your Mac. Troubleshooting can solve minor issues. Regular checks help maintain drive health. Now your WD Passport is ready for Mac use.
Enjoy seamless file transfers and storage.